Chicken Coop Plans Phase 1
- Jan 27
- 5 min read
Updated: Jan 28

Moving with chickens isn't easy! When I tell you we left our old house like the Clampetts, chicken feathers flying off the back of a pickup with crates stacked on furniture, I'm not lying. Wish I had a picture to share.. but maybe that's better left to the imagination.
But before our move date, I knew we had to have a place to move our chickens into, so I spent several weeks before actual move out deadline planning, designing, and building this little coop and run. I knew I needed something simple, and somewhat easy to execute given my less-than-expert building skills. The general shape of a coop is easy to understand, but I just couldn't find a lot of details about exactly how all the pieces and parts fit together.
So, I spent several days just sketching, with graph paper and my calculator, and came up with this plan. I won't say there weren't a few cuss words along the way during the actual execution of these plans, but overall it worked out pretty well.
Since I tend to get overwhelmed when I have a large task and limited time, I decided to build this coop in steps. Even though I had planned out all the pieces in advance, I figured that breaking the project into phases and tackling them one at a time not only made the entire build less daunting, but it also allowed me to make changes to the plan along the way as I saw in person how things actually fit together in real life. And that's how I'm going to share these plans, as a series of posts that break this coop down into managable parts.
And with that, let's dive in to the step 1, WALLS!

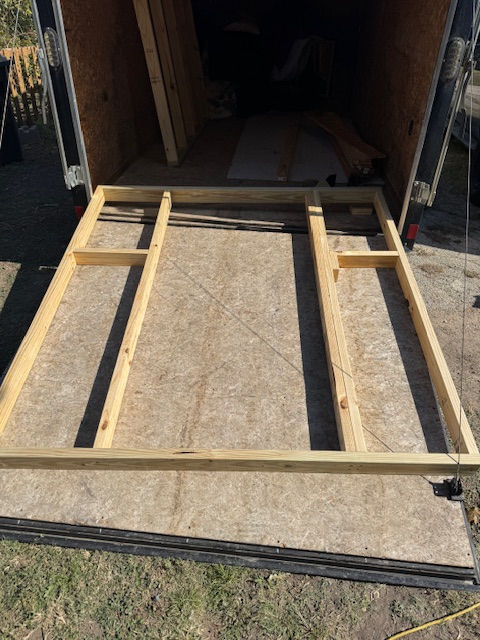
This coop is a 6'5" x 8' building with a large front dutch door, one little chicken door leading to the run, and two windows for ventilation. The walls are pretty straightforward 2x4 construction, fastened with construction screws and wood cut with a miter saw. Each of the four walls is built independantly, then raised and joined atop the foundation of 8x16x4 concrete pavers dug into the ground and leveled.

BUILD LIST FOR FOUR WALLS
(5) TREATED 2x4x8ft
(28) 2x4x8ft (some of these will be cut to size for the 6' lengths, and save the scraps for the small pieces of blocking between studs)
construction pack of 3 inch outdoor construction screws like THESE (star bit is a must for non-strip!)
(2) windows - I used THESE because they fit easily between the studs!
OTHER SUPPLIES
Drill with Star Bit (comes with package of screws if you don't have one)
Miter Saw or Circular Saw
Level
Tape Measure
Note: Another reason I built this in phases is because there was no way I could fit all the wood for the whole project in my Suburban at once!

Here we go!
Wall One: The front wall with opening for door

Cut two of the Treated 2x4s to 6 ft, one for the bottom plate, and one for the top plate since we have a door opening on this wall.
Cut five 2x4s to 6 ft.
Attach end studs to top and bottom plate, with stud ends butting up to the flat top surface of bottom rail, and bottom flat surface of top rails, as shown:

Now that you have your rectangle, you will add the interior studs 18 inches in from the edge. Measure from the outer edge of the outer stud, to the center of the inner stud, as shown:

Using the scraps from your cuts, add the horizontal blocking between studs. You'll cut these to size for each opening, as wood thicknesses, twist, warp, shrink, etc can make each opening slightly different. You'll add these at a height of 4 ft on center of the block, which makes attaching 4x8 paneling easier later on. Screw them in from the stud side, into thecut end of the block.
Add a second stud on the doorway side of the stud that is on the side you want to put your door hinges. Attach this stud both to the top and bottom plate, as well as directly to the sister stud. This gives reinforced strength for the weight and swinging force of the probably over-engineered doors we will be building soon.

Wall One, Done!
Wall 2, The Back Wall

Cut one Treated 2x4 to 6 ft.
Cut six 2x4's to 6 ft.
Attach studs just as you did with wall one, with all studs sitting on top of bottom plate and top rail resting on the butted ends of each stud.
Be sure to measure your 18 inch spacing from the outer edge of the outer studs, and using on center measurements for the inside studs.
Using your scraps, you will cut blocking to size and install at the 4 ft high on center mark. You'll notice that once you have one block in, you can't screw the next one in from the end. I staggered the height of my block just slightly so that I could get screws into the ends at a slight angle.

Walls 3 and 4 The Side Walls

My side walls were identical, because I wanted window placement to be the same on each side. You can put your windows wherever you like, just be sure to test fit window between in the stud gap you want to use as you are attaching stud. I found the windows I recommended fit perfectly into my 16 inch spacing, but you want to be sure as its easier to adjust a tiny bit at this stage than it is to have to make changes later when its time to install them.
FOR EACH SIDE WALL:
Get one Treated 2x4 to use as the base plate and one regular 2x4 to use as the top plate.
Cut seven 2x4s to 6 ft for studs.
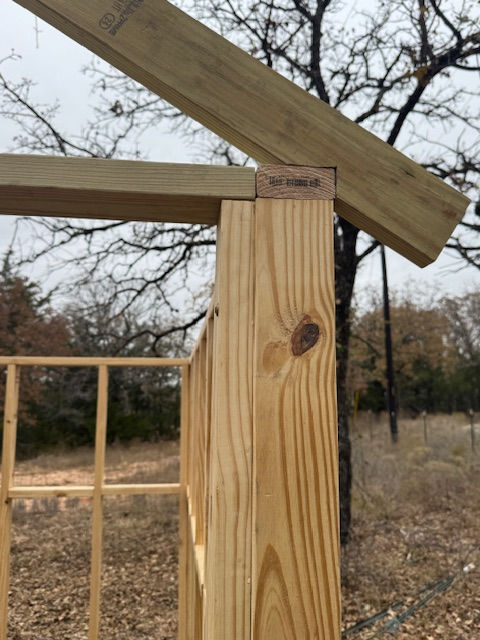
Attach end studs to bottom and top plate just as you did with the other walls, with the stud sitting on top of the base plate and the top plate sitting on the butted end of the stud.
Measure 16 inch gaps this time instead of 18. 16 inches divides the 8 ft length evenly, and it also allows for a little more strength since we will be placing rafters directly above side wall studs. Remember, measure from outer edge of end studs, and use on center measurement for inside studs.
Reminder, choose the gap where you want your window, and test fit the window as you install those studs. If if needs to adjust slightly to accomodate, its fine.
Now you will custom cut your blocking and install again at the 4ft on center height mark.

OK! Now your walls are ready and you're pretty invested, so there's no turning back now!
NEXT UP: PHASE TWO where we get the foundation ready and stand these babies up.


Comments