Chicken Coop Plans Phase 2
- Jan 28
- 5 min read
Moving on to phase 2, where we select the location for the coop and prepare the foundation, put up the walls, and construct rafter pairs for the roof. If you missed Phase 1 where we constructed all four walls, you can get caught up HERE to complete Phase 1.
The location you choose for your coop should be relatively level already, without problems like tree roots, rocks, or bad drainage. Look for a place that will catch morning sun, with enough room around it to make an outdoor run area, and where water won't collect. You want your birds to have a well drained area with places to sunbathe.
Once you know where your coop will go, you're ready to get your foundation started. I opted to use THESE 8 inch wide, 16 long, and 4 deep pavers because they were cheap and gave a little more depth into the ground than the two inch depth one. This keeps predators from digging under and they are less likely to crack under the weight of the coop. Whatever paver you choose, make sure you do the math to get enough linear feet of paver to create a 6.5 ft x 8 ft on center base. This means that your walls should be sitting in the center of your pavers.
MATERIALS AND SUPPLIES FOR FOUNDATION:
(22) 8x16x4 inch concrete pavers
(2) bags of fine play sand
sharp shooter shovel
spade shovel
level
hammer
tape measure
MATERIALS AND SUPPLIES FOR WALL RAISING AND ROOF:
(14) Treated 2x4x6ft (you may have to buy 8ft if 6ft is not available)
1/2 sheet of 1/2 inch plywood
2 inch construction screws
3 inch construction screws
(8) 4 inch construction lag screws like THESE
miter saw
jig saw
tape measure
level
A helper to hold walls
To prepare the foundation site, dig a small trench with your spade to get the perimeter mostly level. Don't build up the soil, because freshly moved soil will settle and can easily wash out in the rain. Instead, the highest point of your foundation should be just under original ground level, and dig down to level from that point around the whole perimeter. Use the sharp shooter if you need to break through rock, clay, small roots or loosen hard ground. Check for level as you go to make sure your trench isn't changing in elevation.
Once you have your perimeter trench, add sand to fine tune low spots and create a stable base for the blocks. Add your pavers and level each one as you go. I also used a straight board to level across the span as I went to make sure I wasn't gaining or losing elevation slightly as I worked. I also found that placing the pavers in a pinwheel pattern gave me the correct measurements, since I discovered that, like most things I buy, the measurements given at a store are never actually completely accurate. This pattern allows you to move and adjust each side independantly to get the right size base that wasn't limited by the size of the pavers. . Be sure to measure diagonally, corner to corner, to get matching measurements to check for square. You'll want to make sure pavers are touching and not leaving little gaps.
To raise the walls, you'll need an extra pair of hands. (Thanks Dad!!) We started by getting the front wall centered on the foundation and then attached the side wall. Bring the side edge of the side wall so that the flat edge of the side is flush with the front edge of the front wall.

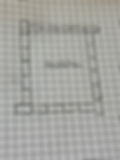
This will create a perimeter that is exactly 8 feet long on the sides, and adds 3.5 inches in length (the actual width of a 2x4) to each side on the front and back of the coop. Check for square and level, which will of course shift as you go but get them as close as you can. Attach the walls together first with the 4 inch lags through the centers of the edge studs, one at near the top and one near the bottom. Then use your construction screws at various points to reinforce. Move to the back wall, then the other side, square and level as you go and attaching as described. This is what you have now (minus the test rafter we had in place when I snapped this pic):

Now you're ready to make rafters. This took a combination of some math and some physical mock-up. I calculated that for a span of half the width of the front (which is now 79 inches with the addition of the side wall widths) of 34.5 inches, and a rafter length of 54 inches, I would get a rise of 33.3 inches from the front top plate to the roof peak and still allow for an approx. 6 inch overhang off the side.
Start by cutting your treated 2x4s to 54 inches. You'll need 14 of these.
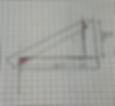
To get the angle correct at the roof peak was more math than I am comfortable with so I made a mock up. Take a board 79 inches long to act as your top plate plus side widths. This is the total front width of your coop. Mark the exact center at 34.5 inches. Now, take a three ft long piece of scrap wood and mark 33.3 inches on one edge. Put the 33.3 inch edge mark at the very center of your 79 inch board, at the 34.5 inch mark. Lay your 54 inch rafter as if it is being installed, with the top edge positioned just as it would be with the top corner flush with the 33.3 inch line and the bottom corner positioned with a six inch overhang and angled for you to make your birds mouth cut where the rafter sits on the top rail. Make sure the rafter is positioned just as it would be installed.
Mark the lines on the rafter to remove the material shown in pink, using the mock up board underneath the rafter as a guide. Remember, double check for square on your mock up, and recheck your measurements and placements before marking.

Using the jig saw, cut out your birds mouth notches and your top angles. Revisit your mock up to endure the board fits exactly as it should fit on your build, with the top angle perfectly perpendicular to the top plate and the birds mouth acknowledging the corner. Once you have ensures your measurements, use this board as the template and mark the remaining boards and cut exactly the same. Keep your mockup in place, you're about to use it again.
Now you have 14 rafters, and you'll pair them up into couples to be joined with a plywood gussets for strength. Take a pair of rafters and place them on your mock up as if they are being installed, with the ridge angles together and correct overhangs in place.

Get a piece of cardboard, and trace out a triangle to use as a template for your gussets. You want the triangle to sit just inside the outer edges of the rafters, not poking up at all which would not allow your decking to be installed later. Cut the cardboard, and check it again to make sure its just the right size.

Cut seven triangles from your plywood, using your template to trace the shape and your jig saw to cut, for your seven pairs of rafters. Match up each pair on your mock up, and install gussets using at least three screws on each rafter. You'll end up with seven lovely pairs like these:

Rest up.. in Phase 3 we put on siding, install windows, attach rafters, and install roof panels!